
概要
Macでスクリーンショットを撮ったら、自動的にWebP画像に変換したい。
M1 Macにて試したところ、エラーが発生してSquoosh CLIが動かせないことがあったので、そのメモも残す。また、Automatorでの連携でハマりポイントがあったため、その解決策も記す。
2023/1/8追記:Squoosh CLIが開発中止となったため、別にGoogleが提供しているcwebpを使用する。
環境
M1 MacBook Air 16GB
OS: Ventura 13.0.1
※ Macの言語を英語としているため、メニューの説明の日本語は恐らくこうだろうという予測で書いているため、厳密に一致していないかもしれない点に注意。
自動化スクリプト作成手順
- Macでスクリーンショットを撮る
- ~/Pictures/ScreenShotにjpgが保存される
- automatorで該当フォルダに画像が保存されたらシェルスクリプトを実行する
- シェルスクリプトにて、squoosh cli(->cwebp)を使ってwebp画像に変換する
Macでのスクリーンショットの撮り方
Appleの「Mac でスクリーンショットを撮る」参照。
ここには載っていないが、Shift + Command + 5が使いやすい。
Squooshとは

Squooshとは、Google Chrome Labsが開発した画像圧縮ツール。
WebP画像等、様々な画像形式に変換できる。
数枚の画像をWebPに変換したいだけなら、Webアプリでドラッグ&ドロップして変換ボタンを押すだけで簡単にWebPに変換してくれる。
Webアプリも非常に便利だが、スクリーンショットを撮って、Finderを開いて画像ファイルをドラッグ&ドロップして、ダウンロードする、というのは少し面倒。特にブログやホームページではWebP画像が必要なため、頻繁にこの操作をすることになる。そこで、自動化する。
Squoosh CLIの導入
!https://github.com/GoogleChromeLabs/squoosh/tree/dev/cli
にあるSquoosh CLIを導入する(2023/1/8追記:開発中止となったため、上記URLはもう存在しない。cwebpを使った方法を後述する)。
Node.jsのインストール
- homebrewでnodebrewをインストールする。
$ brew install nodebrew
- bash使用であれば、.bash_profileにPATHを設定する。
$ export PATH=$HOME/.nodebrew/current/bin:$PATH >> ~/.bash_profile
- zsh使用であれば、.zshrcにPATHを設定する。
$ export PATH=$HOME/.nodebrew/current/bin:$PATH >> ~/.zshrc
- PATH設定を読み込ませる。
$ source ~/.bash_profile
or
$ source ~/.zshrc
- ディレクトリを作成する(事前に作成していないとエラーが出る場合があるらしい)。
$ mkdir -p ~/.nodebrew/src
- nodebrewの安定版をインストールする(一般的に推奨されているもの)。
$ nodebrew install-binary stable
- インストールしたバージョンを確認する。
$ nodebrew ls
v18.12.1
current: v18.12.1
- Squoosh CLI v0.7.2が動作するバージョンをインストールする(安定版や最新版だとエラーが発生して使えなかった。)。
$ nodebrew install-binary v17.6.0
- 新たにインストールしたバージョンに切り替える。
$ nodebrew ls
v17.6.0
v18.12.1
current: v18.12.1
$ nodebrew use v17.6.0
use v17.6.0
Squoosh CLIでWebPに変換できることを確かめる
$ npx @squoosh/cli --webp auto whitedog.png
1/1 ✔ Squoosh results:
 whitedog.png: 542.72KB
  └ whitedog.webp → 141.59KB (26.1%)
劇的に画像サイズが下がっているが、見た目はほぼ変わらないことが確認できた。
v17.6.0ではなく、安定版のv18.12.1で動作させると、以下エラーが発生した。
(node:3428) ExperimentalWarning: The Fetch API is an experimental feature. This feature could change at any time
(Use `node --trace-warnings ...` to show where the warning was created)
node:internal/deps/undici/undici:11118
    Error.captureStackTrace(err, this);
          ^
TypeError: Failed to parse URL from /Users/username/.nodebrew/node/v18.12.1/lib/node_modules/@squoosh/cli/node_modules/@squoosh/lib/build/imagequant_node-a4aafbae.wasm
    at Object.fetch (node:internal/deps/undici/undici:11118:11) {
  [cause]: TypeError [ERR_INVALID_URL]: Invalid URL
      at new NodeError (node:internal/errors:393:5)
      at URL.onParseError (node:internal/url:565:9)
      at new URL (node:internal/url:645:5)
      at new Request (node:internal/deps/undici/undici:9472:25)
      at Agent.fetch2 (node:internal/deps/undici/undici:10291:25)
      at Object.fetch (node:internal/deps/undici/undici:11116:28)
      at fetch (node:internal/process/pre_execution:216:25)
      at instantiateAsync (/Users/username/.nodebrew/node/v18.12.1/lib/node_modules/@squoosh/cli/node_modules/@squoosh/lib/build/index.js:28:11469)
      at createWasm (/Users/username/.nodebrew/node/v18.12.1/lib/node_modules/@squoosh/cli/node_modules/@squoosh/lib/build/index.js:28:12079)
      at /Users/username/.nodebrew/node/v18.12.1/lib/node_modules/@squoosh/cli/node_modules/@squoosh/lib/build/index.js:28:35216 {
    input: '/Users/username/.nodebrew/node/v18.12.1/lib/node_modules/@squoosh/cli/node_modules/@squoosh/lib/build/imagequant_node-a4aafbae.wasm',
    code: 'ERR_INVALID_URL'
  }
}
cwebpを導入する

Squoosh CLIが開発中止となったため、googleの提供しているcwebpを使用する。
$ brew install webp
で簡単にインストールできる。
$ cwebp -version
1.2.4
でインストールOKか確認する。
使い方は、上記URLにあるが、
cwebp [options] input_file -o output_file.webp
となる。optionsでQualityを変更したり、色々とできるが、デフォルト設定のまま使うこととする。
ScreenShotディレクトリ以下の画像を一括でWebPに変換するシェルスクリプトを作成する
~/Documents/Automator/convert_png_to_webp_screenshot.shを作成し、中身を以下通りにする。
#!/bin/bash

TARGET_DIR=$1
if [ X$TARGET_DIR = X ]; then
 echo "Usage example: bash convert_to_webp.sh ~/Pictures/ScreenShot"
 exit 0
fi

cd $TARGET_DIR
mkdir -p ./webp
mkdir -p ./png

if [ ! -e ./*.png ]; then
 echo "No png file is found!"
 exit 0
fi

## Squoosh CLI is obsoleted
# npx @squoosh/cli --webp auto ./*.png

for FILE in `find . -type f -name "*.png" -maxdepth 1`; do
    /opt/homebrew/bin/cwebp "$FILE" -o "${FILE%.*}".webp
done

mv *.webp ./webp
mv *.png ./png
これを実行すれば、~/Pictures/ScreenShotにある全てのpngファイルをwebpに変換し、webpファイルは~/Pictures/ScreenShot/webpへ、pngファイルは~/Pictures/ScreenShot/pngへ移動される。findで-maxdepth 1を入れている理由は、サブディレクトリを除外するため。cwebpをフルパスで指定しているのは、homebrewでインストールしたコマンドはAutomatorではコマンド名だけでは実行できないため。
これでも十分実用的だが、スクリーンショットを撮って、スクリプトをTerminalから実行するのも面倒なため、Automatorを使う。
Automatorでスクリーンショットが撮られたら自動的にWebP画像に変換するようにする

Automatorとは、Macに標準で付いているノーコード自動化ソフト。
色々なトリガーに対して、色々なアクションを設定できる。
トリガーをスクリーンショットの撮影、アクションを先ほどのシェルスクリプト実行に設定する。
Automatorでシェルスクリプトを実行するのは、

を参考にした。
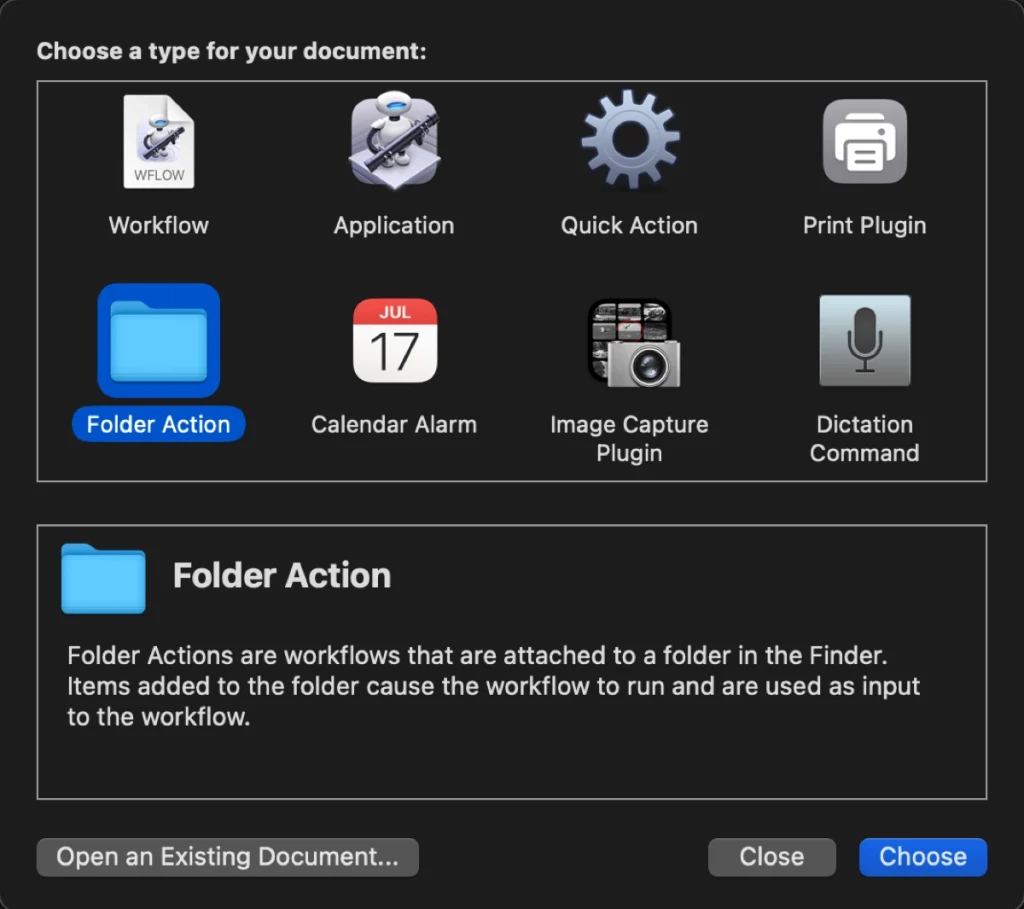
- Automatorでフォルダーアクションを作成する
Command + Shiftで、Spotlight Searchを起動してAutomator.appを起動する。
起動後、フォルダーアクションを選択。
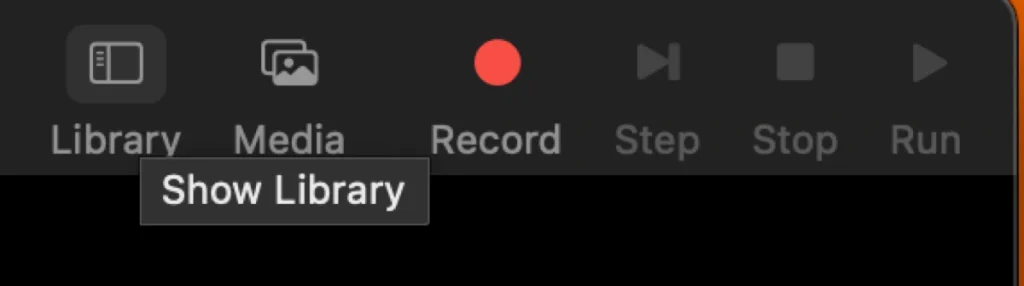
- ライブラリが表示されていない場合は、ライブラリをクリックする
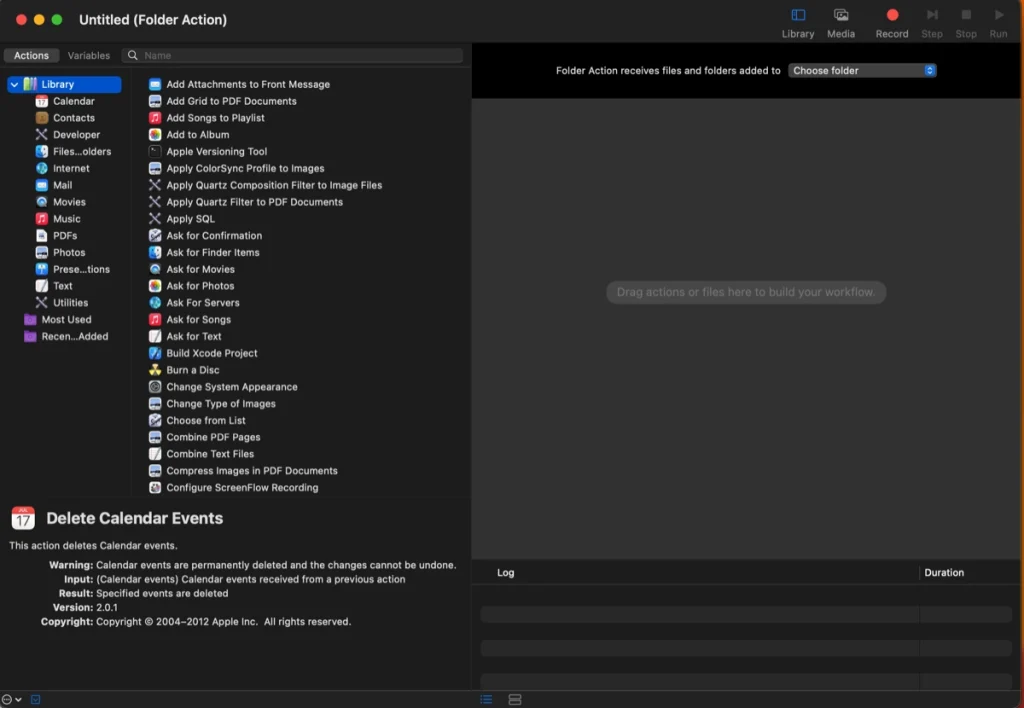
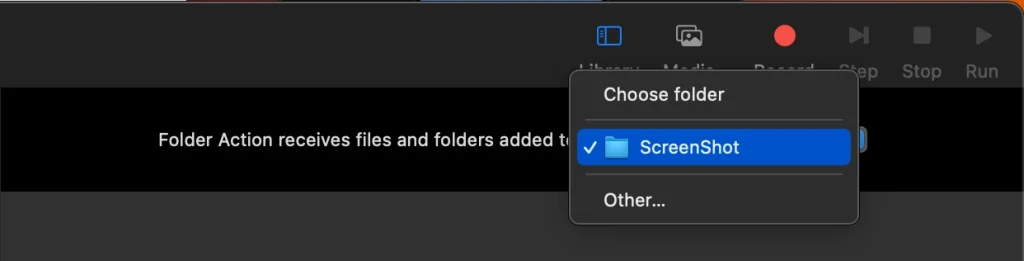
- 対象フォルダをスクリーンショットのフォルダにする
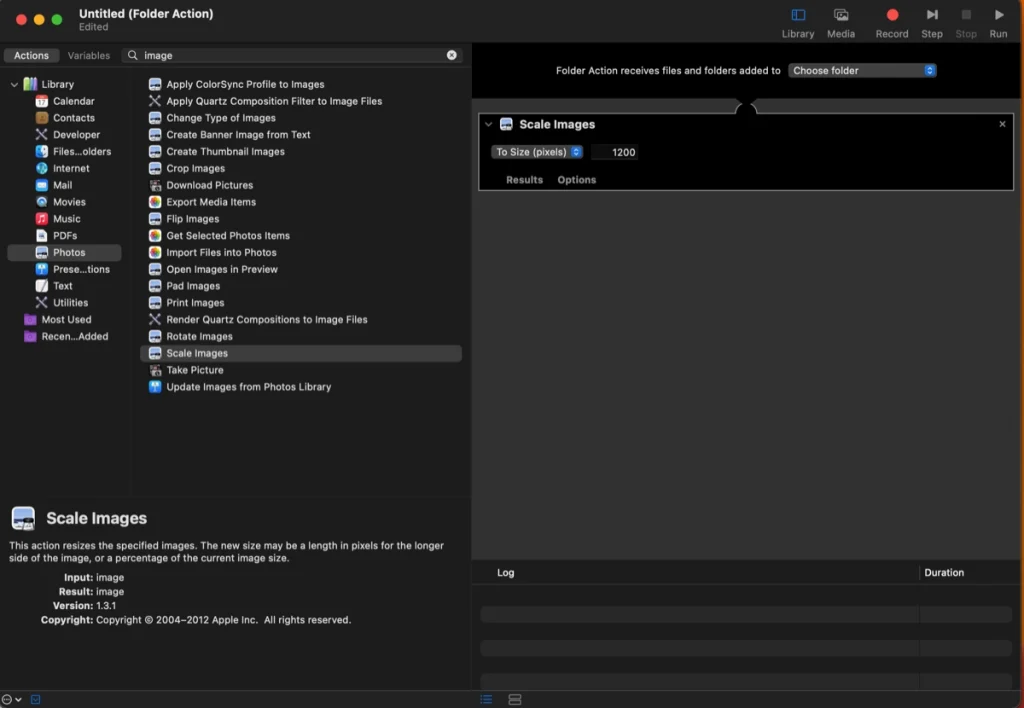
- (やりたい人だけ)スクリーンショット画像の最大サイズを規定する
スクリーンショットの画像は、かなり大きいが一般的なアイキャッチ画像は幅1200pxもあれば十分。そこで最大幅を1200pxにする。
「ライブラリ」→「写真」→「イメージサイズを調整」を右のワークフローにドラッグ&ドロップする。画像サイズを1200とする。これは長い方の最大サイズとなる。
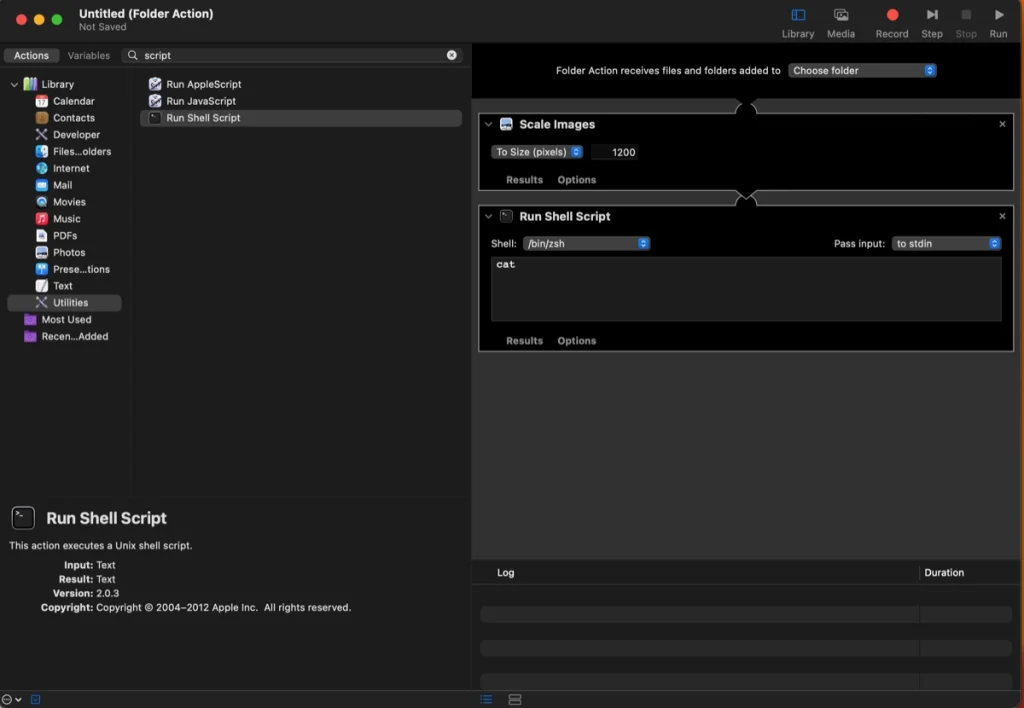
- シェルスクリプトを設定する
「ライブラリ」→「ユーティリティ」→「シェルスクリプトを動かす」を右の画像のリサイズの下にドラッグ&ドロップする。
- [ハマりポイント] Automatorでnpmコマンドを使えるようにする
PATH=$HOME/.nodebrew/current/bin:$PATHを記入する。
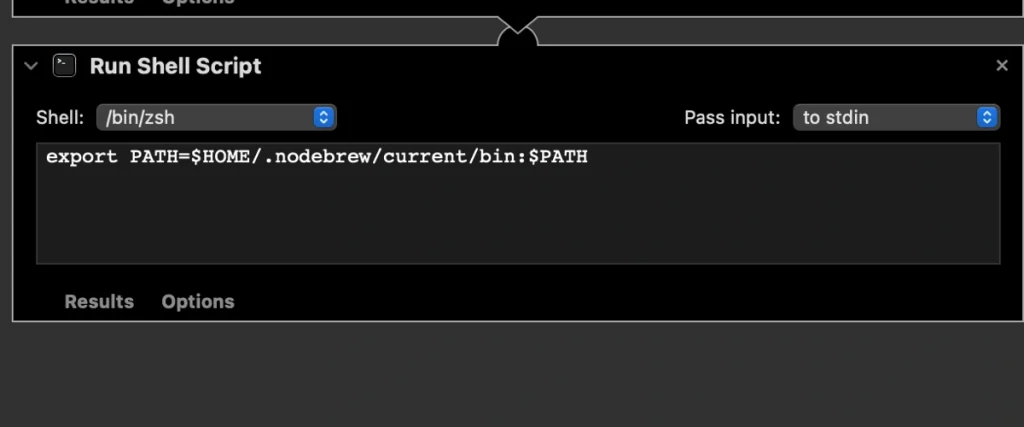
Automatorで実行されるシェルスクリプトは、Terminalの環境設定を引き継がないため、squoosh cliをそのままでは実行できない。そこで、PATHを通す。Terminalでは実行されるのに、なぜかAutomatorで実行されなかったため、少しハマった。権限かと思ったが、npmのパスが通っていないためだった。
- 上で作成したシェルスクリプトを実行できるようにする
Shell: /bin/bashに変更する。
オプションをクリックし、アクションのインプットを無視する設定にする。
先ほどのシェルスクリプトを実行するスクリプトを記入する。
bash ~/Documents/Automator/convert_png_to_webp.sh ~/Pictures/ScreenShot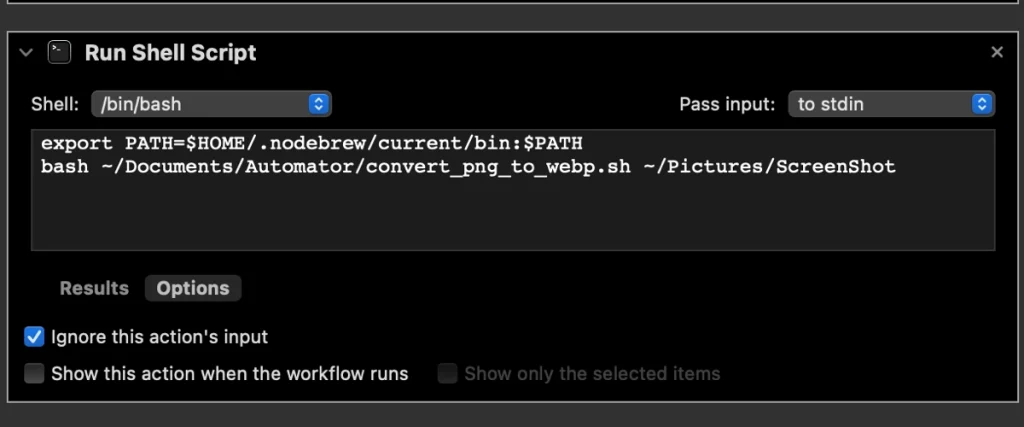
- ワークフローファイルを保存する
Command + Sで名前をつけて保存する。Convert_ScreenShot_to_WebP.workflowとした。
- 自動的にWebP画像が作成されるか実験する
まず、Command + Shift + 5で、スクリーンショットを撮影する。
3秒程度後に、~/Picturs/ScreenShot以下にpngファイルが保存される。
その後、5秒程度後に、上のバーにAutomatorが起動(ギアアイコンが回転)し、変換が始まる。画像サイズにも依るが、10秒程度はかかっていた。その後、~/Pictures/ScreenShot/webpと~/Pictures/ScreenShot/pngにファイルが移動されることを確認する。
- 完成
これで、自動化は完成。
squoosh cliは、本来はオプションが色々と指定できるが面倒だったので、autoとした。
もし、Webアプリ上で設定したパラメータが使いたい場合は、右下のEditの右のコードアイコンをクリックして、コードをコピーする。

npx @squoosh/cli --webp '{"quality":75,"target_size":0,"target_PSNR":0,"method":4,"sns_strength":50,"filter_strength":60,"filter_sharpness":0,"filter_type":1,"partitions":0,"segments":4,"pass":1,"show_compressed":0,"preprocessing":0,"autofilter":0,"partition_limit":0,"alpha_compression":1,"alpha_filtering":1,"alpha_quality":100,"lossless":0,"exact":0,"image_hint":0,"emulate_jpeg_size":0,"thread_level":0,"low_memory":0,"near_lossless":100,"use_delta_palette":0,"use_sharp_yuv":0}'これを、作成したシェルスクリプトのnpxコマンドと入れ替えれば良い。
感想
初めてAutomatorを使ってみたが、簡単に自動化できるのは良いと感じた。
ただ、実行が少し遅かったので、もう少し速く実行できると良いと思った。
今回はpngをwebpに変換するようにしたが、他にも色々と応用できる。
Automatorを使わずとも、上記スクリプトをちょい変すれば、他の画像形式に一括変更もできるし、使い道は色々とあるはず。
この記事を書く際のスクリーンショットも全てこのAutomatorによる自動WebP化を施した。やはりSquooshのWebアプリを使うよりも遥かに楽で時短に繋がった。

コメント